

Showing posts with label Babies. Show all posts
Showing posts with label Babies. Show all posts
Monday, September 24, 2012
Piggy Bank Practice


Tuesday, September 4, 2012
Mess-Less Toddler Paint Bag

Ava (16 months) LOVES to paint. Man oh man, that girl is into all things arty; the messier, the better. Only one small hitch. I hate the clean up. With Eden (3 1/2 years), no problem! She's super neat, so clean up is always minimal. On the other hand, you could give Ava a thimble-full of paint and five minutes later she would have it all over herself, the couch, your clothes, your keys, the fridge and the curtains - that is, if she didn't eat it straight away.

Solution? A Paint Bag!
Simply squeeze some non-toxic paint into a ziplock bag, seal with masking tape/duct tape and you're ready to go!

Tuesday, August 14, 2012
An Invitation to Paint

Sometimes, it's all in the approach. I have found that if I present an activity to my kids in a visually appealing way, they are on board! This is especially effective if I set it up as a surprise - they go to bed for a nap, wake up and ... oh, look! It's a painting station!
Tuesday, December 20, 2011
Shell Treasure Box for Babies
 Inspired by big sister Eden's recent play time with shells (see here), I put the biggest shells in our collection into a sturdy shoebox and set my little Ava baby up in front of it. She was so excited, lots of foot wiggling and hand waving!
Naturally, the shells went straight into the mouth for some dribbly fun...

Tuesday, November 29, 2011
Fingerpainting for Babies
Who says babies can't fingerpaint? A little ingenuity and a willingness to see your child (and floor, and any adjacent surfaces) covered in muck, and you'll have yourself a fun-filled half-hour or so with your little munchkin.
Although non-toxic poster paint/acrylic paint is, well, non-toxic, I still feel apprehensive about letting Ava anywhere near it. Especially whilst she's in the 'how-can-I-fit-everything-in-sight-into-my-mouth' phase. So I mixed a bit of plain flour with some water and food dye, and came up with my own version of fingerpaint which is safe for babies. It's not a substitute for actual fingerpaint though (ie: the stuff you would use for your toddler, or for use on paper), but it served my purposes just fine.

Although non-toxic poster paint/acrylic paint is, well, non-toxic, I still feel apprehensive about letting Ava anywhere near it. Especially whilst she's in the 'how-can-I-fit-everything-in-sight-into-my-mouth' phase. So I mixed a bit of plain flour with some water and food dye, and came up with my own version of fingerpaint which is safe for babies. It's not a substitute for actual fingerpaint though (ie: the stuff you would use for your toddler, or for use on paper), but it served my purposes just fine.
The paint:

Monday, November 28, 2011
Water Play - Baby Version

 I wish I had thought of this earlier! On a warm day recently, I put a bit of water into a shallow container, popped baby Ava into her highchair and added some bits and pieces for her to play with: plastic toy food, a rubber sieve, measuring spoons, wooden spoon and a spatula. Then, I stood back and let the splashing begin!
 Tuesday, November 22, 2011
Treasure Baskets Part 3.

Since my now seven-month old is teething and everything goes straight into her mouth, I thought a soft play basket was in order this time.
Wednesday, November 9, 2011
Water Play and Pouring

Thursday, October 20, 2011
Treasure Baskets Part 2.


I struggled at first to find wooden items that were child-sized and gum-friendly, but hit the payload when I was rummaging through the play room. She loved the top (which she is pictured sucking on, above), and was mesmerised by it as Big Sister sent it spinning along the floor. I think I'll keep this one out for a while, Ava seemed to get a lot from it.
Next task: develop a few treasure baskets adapted for my toddler (who's been telling people that she's six years old thank-you-very-much). Wish me luck!
Wednesday, October 19, 2011
Treasure Baskets
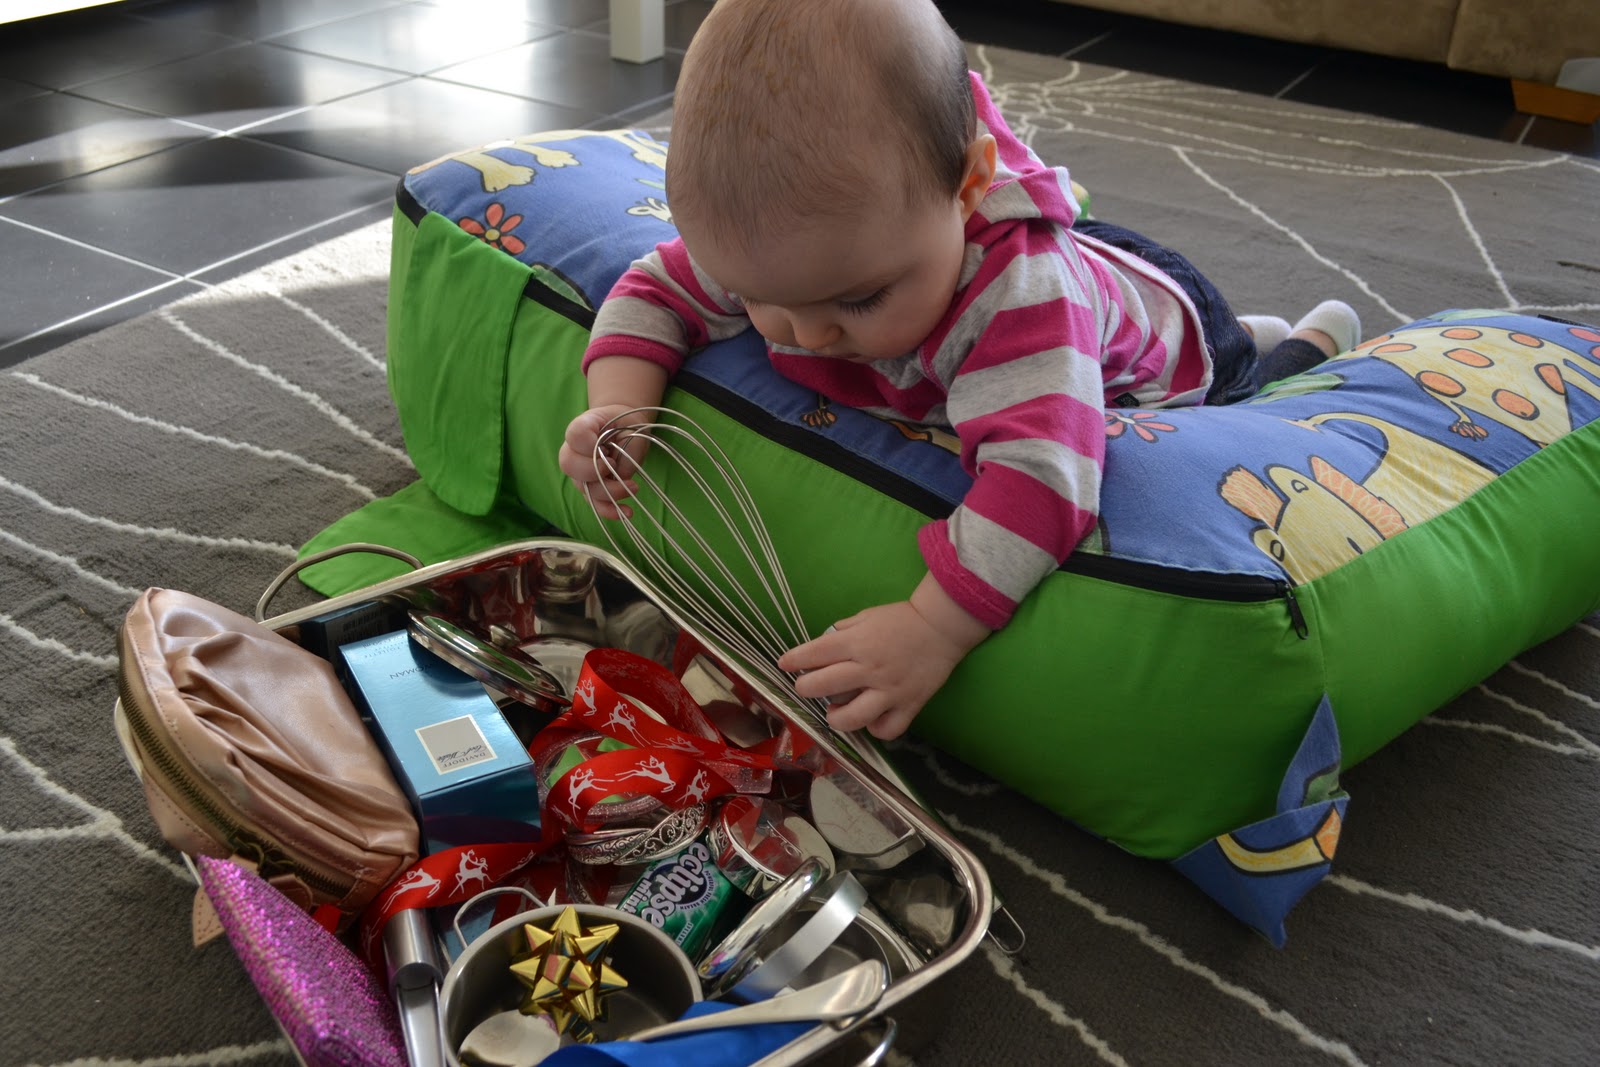 Have you heard of the term 'heuristic play'? If not, it is essentially the concept of offering your child a range of non-commercial, preferably natural materials to explore, whilst you sit quietly and observe. No plastics please! I've said this a thousand times since having Eden: plastic is NOT fantastic! It has its uses, and some plastic toys are fun, but the majority of them are single-use items and most children will discard them after only a few plays. Offering our kids a variety of plastic toys which look different will still feel, taste and smell the same to our babies.
 Objects made from natural materials engage your child's senses. They enable their developing brains to make more neural connections which forms the basis of healthy cognitive development in future. They stimulate your child's sense of taste, smell, touch, sight and possibly hearing (depending on what it is). They are, in short, highly preferable!
Heuristic play allows your bubba to choose their own object/s from those offered, and encourages them to construct their own understanding of these items (hence your non-involvement) through handling and mouthing. Your role is to supervise. That's it.
 To introduce heuristic play to your little one, collect a range of materials from around the house (about 20-30 items is great) and put them in a broad, shallow container. Round baskets are preferable because the contents are easily accessible from all angles, hence the term 'treasure baskets'. In my case, it should have been called 'treasure roasting pan'. But anyway... In your treasure baskets you could group like items together and offer a basket of wooden things, or metal things, or noisy things, or soft things, etc, or you could offer a jumble of items. There's no right or wrong, just offer variety. I chose to do a 'reflective surfaces' for my first go with Ava.
  Ava loved it! I had to reign in my innate desire to tell her what they're called and what they can do, but I'm glad I did. She LOVED it! Since introducing these sorts of experiences into our playtime, she has become more alert (although she always has been alert) and into everything! I think it's helped with her confidence, and awakened her natural curiosity even more (help! Just kidding!). Look at her cute little face!
From what I've read on the subject, many people make up a number of baskets and offer them on rotation. However, I use some of the things that I offered Ava (my whisk, thank you little Miss!) and so I unpack the box/basket after she's done using it, and make up another one every couple of days. Personally, I keep offering the same basket 2-3 days in a row, and then offer a completely different one. After all, if there's 20-30 items offered, chances are she's not going to explore all of them in one hit.
Try things like wooden spoons, shells, doilies (fabric ones), fabric off-cuts in different textures, bells, wooden massagers, pine cones, little cushions, little tins (maybe filled with things to make different sounds, like sand or rice), big bits of cork, small cardboard boxes or velvet ring boxes, leather bits, etc. Anything you can think of! Just be sure to supervise carefully, your baby will mouth these items and you don't want them to choke on the beads of a necklace that breaks in their mouth, or something.
Let me know how you go, and what was a success for your little one! ~ L.
Wednesday, October 12, 2011
What Do Pom Poms and Ice Cubes Have In Common?
Answer: Ice cube trays of course! 
I can practically see eyebrows being raised as I write this, but it's true. One of the best activities I do with Eden is to set her up with some empty ice cube trays, a bag of pom poms and a pair of mini tongs. She sits happily and transfers the pom poms from one tray to the other with the tongs (great for fine motor skill development), or sorts them into the trays by colour or size, or decides that the pom poms are my lunch and that Mummy needs to be a good girl and eat all of it, thank-you-very-much.

Actually, pom poms are a great item to add to your little box-of-tricks, they could be rabbit tails for puppets, decorations for party hats or clown hats (dress ups!), your littlie could try blowing the pom poms from one point to another with a straw, you could put a whole bunch of them in a bag of netting as a tactile bag for babies, or you could put some in a small plastic bottle for babies to play with - it's very visually stimulating for them. Be careful around babies though, brightly coloured and small pom poms may look like fun to chew on...and I'm pretty sure they're not. Keep away from the bubbas unless they're in a sealed bottle or bag.
Coloured Rice


For a different experience, I set it up again this afternoon with bits from her tea set and some of her play pots, pans and utensils. She had a ball serving rice tea and pouring it from the teapot into the cups (see below).


.
At nearly six months old, Ava is obviously to young to play with rice in the same way as Eden, so I put some rice into a medium sized ziplock bag and put a few little objects in it (see photo below) and sealed the bag up with masking tape. She mushes it around with her hands (and her feet) to find the objects hidden by the rice. It's actually a very tactile activity for her, even though she's feeling the objects through the plastic, but obviously requires supervision, just in case the bag breaks.


Other coloured rice activities which I intend to try include:
- Pouring some into plastic bottles to form shakers.
- Pouring some into a cardboard cylinder and sealing up the ends, getting your tot to decorate the cylinder with stickers or oil-based crayons to make some more shakers!
- Drawing a basic picture (or a letter/number) onto stiff cardboard with a thick marker, covering the picture with PVC and letting your littlie sprinkle rice over it. Leave to set for a few minutes, then shake off the excess.
- Using the rice to make some beanbags (ok, ricebags) from felt. You'd obviously have to do the sewing yourself, but your toddler could 'paint' a picture on the bags with fabric paint, or they could superglue sequins or lace onto it.
I'm sure there are heaps of other ideas out there, feel free to post ideas you have in the comments section! ~ L.
This post has been linked to Baby Play Friday at Sense of Wonder.
This post has been linked to Baby Play Friday at Sense of Wonder.
Bubbles Challenge
Ava loved this! I found it difficult to think of a bubbles activity as per this week's Play Time Challenge.

Monday, October 10, 2011
Heads and Shoulders, Knees and Kisses!
I used to play this game with Eden when I was teaching her about body parts, and now I love watching Ava enjoy it. If the room is warm enough, have your baby just in her nappy - maybe before a bath? - and name parts of her body over and over, whilst kissing that part. "Look, this is Ava's leg *kiss, kiss*, and this is Ava's tummy *kiss, kiss* and I see Ava's hand! *kiss, kiss*", and so on. Babies just giggle and squeal! After all, they're getting three of their favourite things; your time, your attention and your affection. For more on the importance of affection for your baby, check out this book.
For older tots, play the game the same way, except every now and again, deliberately misname something, to see if they pick up your mistake. This checks their comprehension skills and you may be surprised at how much they've understood. If they do pick up your mistake, pretend to be confused and give more kisses to 'check'; [kissing the arm] "This is Ava's leg....no? Are you sure? *kiss, kiss* hmm, I think it's Ava's head *kiss, kiss*...oh, I was wrong, it's Ava's arm! *kiss kiss*". I don't know if this game actually helps your child to learn body parts, but hey, any excuse to smooch our little bubbas!
For older tots, play the game the same way, except every now and again, deliberately misname something, to see if they pick up your mistake. This checks their comprehension skills and you may be surprised at how much they've understood. If they do pick up your mistake, pretend to be confused and give more kisses to 'check'; [kissing the arm] "This is Ava's leg....no? Are you sure? *kiss, kiss* hmm, I think it's Ava's head *kiss, kiss*...oh, I was wrong, it's Ava's arm! *kiss kiss*". I don't know if this game actually helps your child to learn body parts, but hey, any excuse to smooch our little bubbas!
Kitchen Mini-Mobiles

I take some of my utensils which are safe for littlies, and hang them with yarn from the handles, usually about two items together; whisks, measuring spoons and cups, wooden spoons, spatulas, ladles, tea-strainers, bamboo skewers...just kidding about that last one!
Ava wanders around the kitchen reaching for them, banging them about, and sucking on them. Eden likes to jingle the utensils to get her attention and to entice her around the space. From doing this, Ava has learnt how to direct herself in the walker and how to reach and attain an object by herself. Just remember that the items are hanging on your cupboards! More than once I've found myself looking for that measuring spoon...
Thursday, October 6, 2011
Sensory Cards
Another one for the bambinos, but young toddlers (1yr-18months) will enjoy it too. It's a lot of work to set up even though it's extremely simple, but mine took about 2 hours to do. All you have to do is stick items with different textures onto some sturdy card stock. That's it.
You can staple it together into a book (don't forget to put duct tape over the spine to protect baby's hands from the staples), join it with binder rings, or use a bulldog clip to hold them together so you can take them apart and rearrange the order of the cards, or take a few out at a time (that's what I did).
These are the cards I made for Ava:


On my cards I had satin ribbon, ice-cream sticks, netting (from cheese bags), foil, buttons, pipe cleaners, scrunched up paper, foam which I cut into underwater shapes, felt pieces, bubble wrap, lace, pom poms, and leather pieces. You could also use shells, fake flowers, raffia, wool pieces, fabric scraps, feathers, corrugated cardboard, paper clips, leaves ... whatever you can find!
Ava LOVES this book! She's quite rough with it, as she's still learning to control her little hands, so I lay her down for tummy time and lay a few cards in front of her. Eden and I talk to Ava about what's on the cards (what colours we see, the shapes, how it feels - rough, smooth, strethy, soft, etc). If you wanted to, you could also hot glue your textures onto cork coasters, or into a scrapbook, or onto the sides and lid of a box. Babies love to explore through touch, and this provides a nice sampling for them. Good luck!
You can staple it together into a book (don't forget to put duct tape over the spine to protect baby's hands from the staples), join it with binder rings, or use a bulldog clip to hold them together so you can take them apart and rearrange the order of the cards, or take a few out at a time (that's what I did).
These are the cards I made for Ava:


On my cards I had satin ribbon, ice-cream sticks, netting (from cheese bags), foil, buttons, pipe cleaners, scrunched up paper, foam which I cut into underwater shapes, felt pieces, bubble wrap, lace, pom poms, and leather pieces. You could also use shells, fake flowers, raffia, wool pieces, fabric scraps, feathers, corrugated cardboard, paper clips, leaves ... whatever you can find!
Ava LOVES this book! She's quite rough with it, as she's still learning to control her little hands, so I lay her down for tummy time and lay a few cards in front of her. Eden and I talk to Ava about what's on the cards (what colours we see, the shapes, how it feels - rough, smooth, strethy, soft, etc). If you wanted to, you could also hot glue your textures onto cork coasters, or into a scrapbook, or onto the sides and lid of a box. Babies love to explore through touch, and this provides a nice sampling for them. Good luck!
Exploring Kitchen Items

This is one for the babies. Simply set your baby down somewhere safe and put some safe kitchen items within reach. I tend to do this in categories, such as:
- Containers and lids, with rounded edges,
- Metal things such as whisks, cooking spoons, measuring spoons, colanders
- Plastic things like Eden's plates, bowls and cups, lunchboxes, spatulas, measuring cups
- Soft things like teatowels, UNUSED sponges and chux wipes and rubber gloves

*Note: do not leave your child to do this unsupervised. These items are safe enough, but you don't want your baby biting a corner off a sponge and choking on it.
Small babies, like my daughter, may need help to hold some awkward items.This activity is great for facilitating exploration and letting your bubs try many different textures. As your child gets older, they will enjoy putting items inside one another, stacking containers, and sorting into categories. This could also lead into role playing for toddlers; Eden loves pretending to cook with my utensils whilst Mummy makes dinner.
Subscribe to:
Posts (Atom)


