Hi all, we've got our very first colour-theme day coming up this Thursday 3rd November 10:00am at Lysterfield Lake, Narre Warren North, please see here for further information.
There will be a 'door prize', but no door, for those attending, which will be a customised children's tee and an age-appropriate kids book, valued at $20.00. The prize will be sent to the winner shortly after (since it's customised, I obviously won't have it with me).
Please remember, it is BYO everything: food, drink, and activities for kids which they may not need anyway since they'll probably just be chasing each other around the place.
Come along, make some friends, green it up and maybe win a prize! We'll see you there!
Monday, October 31, 2011
PLAY TIME ~ NOV 1st - NOV 7th
This week, play with WOOL/YARN.
At some point this week, try a game or activity with your little one that you've never played before, which involves wool or yarn.
Please post your game either in the comments attached to this post or on our Facebook page (where you can include photos if you like), so we can inspire other parents with our ideas!
Thanks for reading! ~ L.
Egg Carton Stamping
For last week's Play Time Challenge (to use an egg carton, see here for the post), I thought it might be fun to try egg carton printing. First of all, I cut the carton up like so:


Friday, October 28, 2011
River Stones
At the moment, I'm really trying to attune Eden to her sense of touch.
I'm not against TV in general, but really, it's just a whole lotta visual information. I feel it's important to give your children the opportunity to develop their other senses too, and it's so simple to do.
You could incorporate it into your day in a thousand different ways. For example, next time you're at the park, ask your tot to close their eyes and you begin talking to them about all the things you can smell; the flowers, the grass, the soil after the rain, the bark of the play equipment, etc. Use descriptive language, talk about whether the scent is pleasant or not. Then ask them what they can smell, and prompt them of they seem to be struggling to find the right words. So simple!
Feely Bag
If you've only got ten minutes to spend doing something with your child and you're looking for an activity that's easy to set up, this is it! I got four items of different textures in a little platter: a flower hair clip, a foam block, a glass perfume bottle and a wooden train. I showed them to Eden and gave the items to her to feel, one at a time. We talked about different words that could describe that item beyond just describing its appearance. For example, the perfume bottle was cold, hard, had straight bits and round bits and smelled 'pretty'. This will give your littlie more words to add to their ever-expanding vocabulary, helps them to think about other properties of an item (beyond only using visual cues) and primes them for the next part of the game.

Drip, Drip, Drip
 If you're looking for an activity to promote fine motor skills and introduce your tot to the concepts of transference and volume, then this is it! It was so easy to set up, and occupied Eden for a solid 45 minutes while I cooked dinner.
Rainmaker!
I've got a great excuse for you to buy some Pringles...you need the container to make a rainmaker! Totally legitinate! Well, that's what we used our empty Pringles tube for. The night before (whilst my girls were sleeping) I pushed some long nails into the sides of the tube, like this:


Monday, October 24, 2011
Counting Cards
Numbers is one of those things that many toddlers pick up quite easily. I used to count everything I could from when Eden was less than one year old; cars on the street, letters in the mailbox, books on my bedside table, cans in the cupboard...everything. The upshot of this was that Eden knew how to count to ten when she started speaking, because she had heard me count so often. So now, I'm trying to extend her numeracy knowledge.
I made four cards, wrote the numbers at the bottom of each card (always slipping in literacy whenever I can!) and marked each card with dot/s to represent the numbers.

I made four cards, wrote the numbers at the bottom of each card (always slipping in literacy whenever I can!) and marked each card with dot/s to represent the numbers.

Mama's Helper - Setting the Table


Toddlers absolutely love being independent. As my daughter's skills and capabilities grow, I'm on the lookout for ways to give her more responsibility (not like chores, just opportunities). The other day I decided to teach her how to set the table, so I got some thick A3 paper, sat down with her, and traced the outlines of our plates and cutlery onto each sheet, with her watching. I explained that this was to help her to know where to put everything.
I asked her to put each 'placemat' on the table, and then I laid out the plates and cutlery on a tray, which I placed near our table. It was very sweet to see her carefully (and very seriously) laying everything out on the placemats for dinner, and she was so proud that she did it "all by myself, Mummy"! Next time I'm at the shops, I'll be looking out for a small water pitcher so that she can start to pour our waters too.
**Note: If you're thinking of doing this with your toddler, remember to supervise! Teach your child how to hold the knives (butter knives in our case) and the plates/glasses properly, and be close at hand to intervene before accidents happen.
Green Day Date has Moved!
Hi all, if you were interested in attending our Green Day themed morning out at Lysterfield Lake, we'll now be holding it on Thursday the 3rd November, same time, same place (see here if you want the details), due to expected rain. Hopefully the weather will be better next week! :D
PLAY TIME ~ OCT 24th - 31st
This week, play with an EGG CARTON.
For a baby, this may be putting a favourite small toy inside the carton, closing it and then opening it again, to teach the concept of object permanence. For a toddler, you might use the cups for sorting (thanks Kim for that idea!) or make a caterpillar out of it.
Please post your game either in the comments attached to this post or on our Facebook page (where you can include photos if you like), so we can inspire other parents with our ideas! Also, a big thank you to Nicki and Andrea who have shared their ideas from Play Time from the past two weeks!
Reminder: Green Day!
Tomorrow, Tuesday the 25th of October, we will be having a Green Day at Lysterfield Lake in Narre Warren North. See here for full details.
Bring your kids along and check out other parent's ideas. We'll be kitting up in some green gear, reading green books, and I'm preparing some activities for Eden and Ava which involve green things! Should be a great day, come along if you can!
Bring your kids along and check out other parent's ideas. We'll be kitting up in some green gear, reading green books, and I'm preparing some activities for Eden and Ava which involve green things! Should be a great day, come along if you can!
We're on Facebook!
If you're an FB kind of person, head on over to our new page Happy Little Munchkins on Facebook.
It's still a work in progress, but you'll be able to see when we have new posts up, be invited to events, post your own photos of your 'Play Time' ideas, and connect to other parents!
It's still a work in progress, but you'll be able to see when we have new posts up, be invited to events, post your own photos of your 'Play Time' ideas, and connect to other parents!
Felt Box


 Last night, I was struck with a flash of inspiration. I was trying to think of ideas to occupy my toddler during church, and I thought I would make her a mini felt board. In the end, I made her a felt box! I covered a cardboard box with felt, and cut out various shapes from more felt, stuck it inside a ziplock bag and stored the pieces inside the felt box, which closed with a bit of velcro. The whole process took about half an hour, if that, but the result was pretty good.
I tried to make pieces that could be part of a story: a girl, a car and a house, things from a garden, numbers (1-5), etc. She enjoyed it – I just wish she had enjoyed it for more than five minutes! Ah well, I'll pull it out again soon and hopefully there won't be someone with lots of pretty jewellery nearby to enthrall (and distract) her!
Tops 'n' Tails

Another easy game to set up, although Eden found it a bit too simple. I did some basic drawings of animals on bits of cardboard, all facing the same way, coloured them in and cut them in half. It was her task to match top and tails. I'm going to try to do this game again, but maybe I'll cut the animal pictures into thirds, or leave the pictures uncoloured (to rescind a visual cue).
Have a bit of fun with your littlie and turn mistakes into an opportunity to create your own animal: a turtle-lion combo could be a turtion or liurtle (Eden loves doing this). Make up a story with your new creature as the star!
You could also slip in some other information into the game, like what sounds the animals make, what colours they are, what type of environment they live in, etc. Laminate the cards, and you can use them again and again, and make up new games too!
Nursery Rhyme Sequencing

If you're tight on time, this is a cinch to prepare. It took me less than five minutes! All I did was take one of Eden's fave nursery rhymes, Incy Wincy Spider, and break it down into four 'events'; Incy Wincy climbs the water spout, gets rained out, the sun dries him off, and then Incy Wincy climbs the spout again. Draw simple illustrations of each scene onto cardboard, cut into cards, and presto! You're done!
Your child's task is to put the pictures into sequence. To make it simpler, you could begin with only two scenes; or, you could sing the song with your tot as you help them put the scenes on order. To add a bit of difficulty, you could add more scenes; or, you could choose a longer/more difficult nursery rhyme; or, you could have two rhymes (2-4 scenes each) and mix up the pieces so that your child has to sort the cards by song, and then by sequence. I put the pieces into a ziplock bag, and take it with us when we're out and about.
Thursday, October 20, 2011
Treasure Baskets Part 2.


I struggled at first to find wooden items that were child-sized and gum-friendly, but hit the payload when I was rummaging through the play room. She loved the top (which she is pictured sucking on, above), and was mesmerised by it as Big Sister sent it spinning along the floor. I think I'll keep this one out for a while, Ava seemed to get a lot from it.
Next task: develop a few treasure baskets adapted for my toddler (who's been telling people that she's six years old thank-you-very-much). Wish me luck!
Wednesday, October 19, 2011
Treasure Baskets
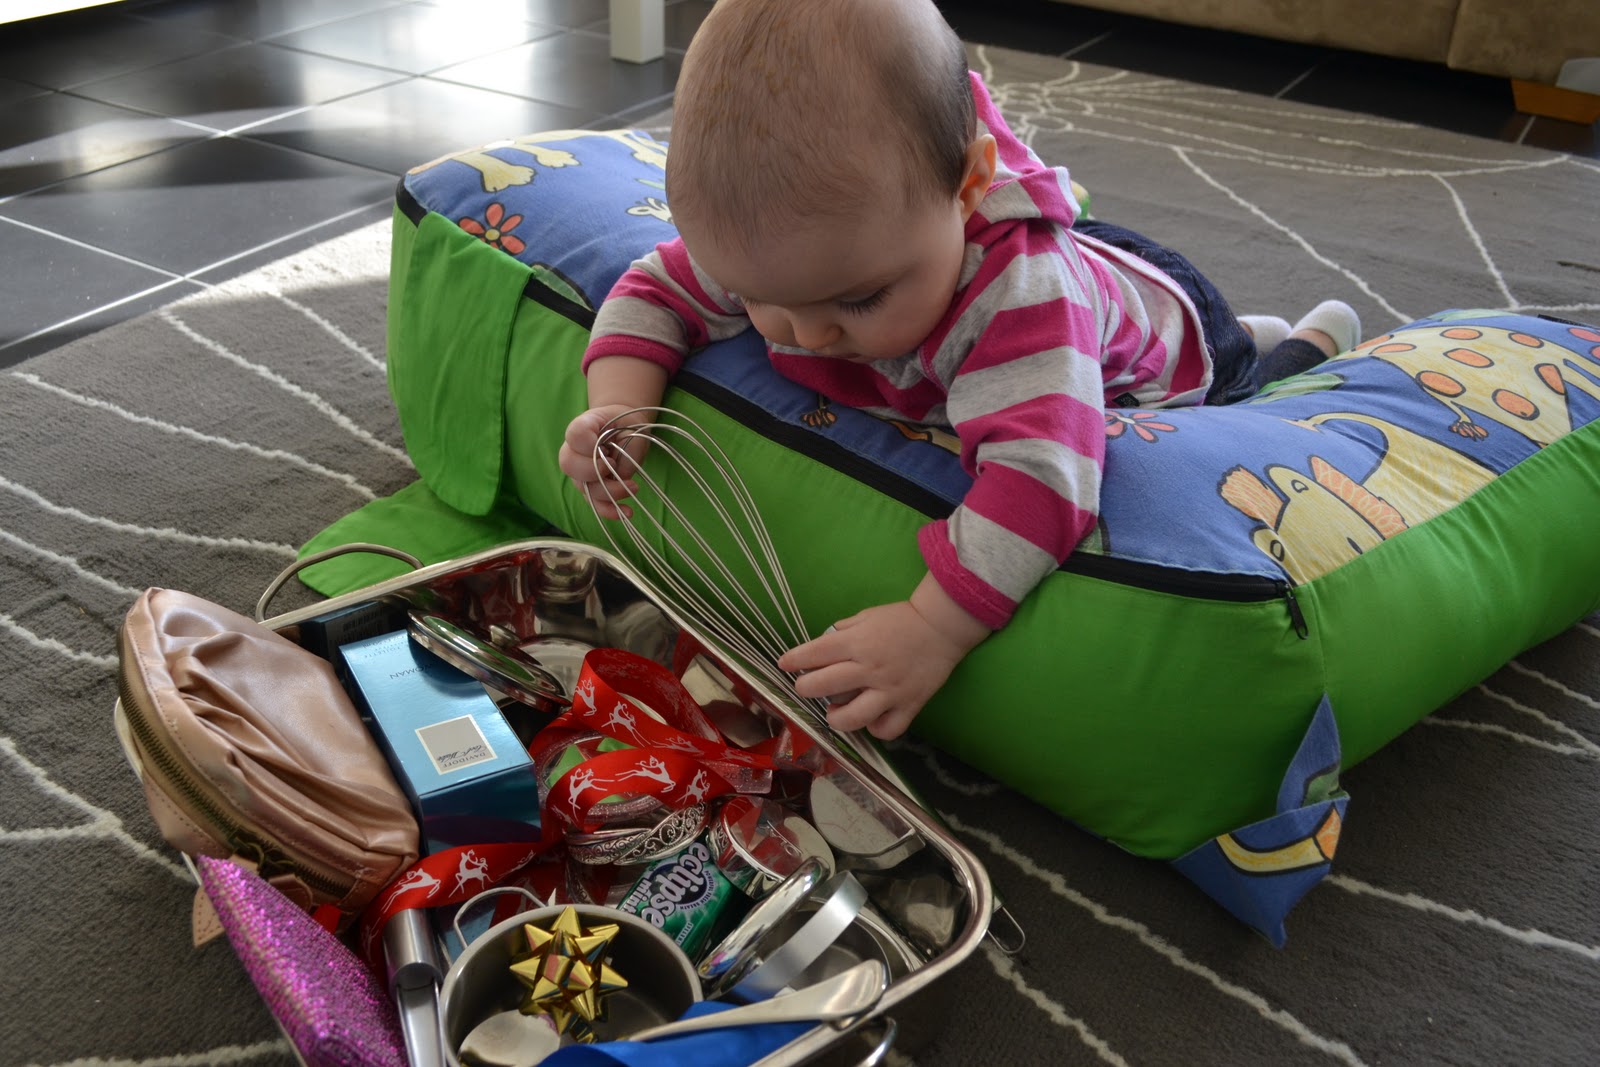 Have you heard of the term 'heuristic play'? If not, it is essentially the concept of offering your child a range of non-commercial, preferably natural materials to explore, whilst you sit quietly and observe. No plastics please! I've said this a thousand times since having Eden: plastic is NOT fantastic! It has its uses, and some plastic toys are fun, but the majority of them are single-use items and most children will discard them after only a few plays. Offering our kids a variety of plastic toys which look different will still feel, taste and smell the same to our babies.
 Objects made from natural materials engage your child's senses. They enable their developing brains to make more neural connections which forms the basis of healthy cognitive development in future. They stimulate your child's sense of taste, smell, touch, sight and possibly hearing (depending on what it is). They are, in short, highly preferable!
Heuristic play allows your bubba to choose their own object/s from those offered, and encourages them to construct their own understanding of these items (hence your non-involvement) through handling and mouthing. Your role is to supervise. That's it.
 To introduce heuristic play to your little one, collect a range of materials from around the house (about 20-30 items is great) and put them in a broad, shallow container. Round baskets are preferable because the contents are easily accessible from all angles, hence the term 'treasure baskets'. In my case, it should have been called 'treasure roasting pan'. But anyway... In your treasure baskets you could group like items together and offer a basket of wooden things, or metal things, or noisy things, or soft things, etc, or you could offer a jumble of items. There's no right or wrong, just offer variety. I chose to do a 'reflective surfaces' for my first go with Ava.
  Ava loved it! I had to reign in my innate desire to tell her what they're called and what they can do, but I'm glad I did. She LOVED it! Since introducing these sorts of experiences into our playtime, she has become more alert (although she always has been alert) and into everything! I think it's helped with her confidence, and awakened her natural curiosity even more (help! Just kidding!). Look at her cute little face!
From what I've read on the subject, many people make up a number of baskets and offer them on rotation. However, I use some of the things that I offered Ava (my whisk, thank you little Miss!) and so I unpack the box/basket after she's done using it, and make up another one every couple of days. Personally, I keep offering the same basket 2-3 days in a row, and then offer a completely different one. After all, if there's 20-30 items offered, chances are she's not going to explore all of them in one hit.
Try things like wooden spoons, shells, doilies (fabric ones), fabric off-cuts in different textures, bells, wooden massagers, pine cones, little cushions, little tins (maybe filled with things to make different sounds, like sand or rice), big bits of cork, small cardboard boxes or velvet ring boxes, leather bits, etc. Anything you can think of! Just be sure to supervise carefully, your baby will mouth these items and you don't want them to choke on the beads of a necklace that breaks in their mouth, or something.
Let me know how you go, and what was a success for your little one! ~ L.
Elephant Balancing
One of my daughter's favourite songs at the moment is about elephants balancing on a string:
"Three gray elephants balancing
Step by step on a piece of string,
They thought it was such a wonderful stunt
That they called for another elephant.
Four gray elephants balancing...."

So, I taped a piece of sting onto the floor, and started teaching her how to walk on it, one foot in front of the other. I told her that we were walking on a piece of string over a creek and if we fell, we'd get all wet! She LOVED this idea. One moment Eden's carefully walking along our string, the next she's flinging herself off it, saying "I'm all wet now! I need new shoes Mummy!"; she would do anything for more shoes *sigh*.
This activity is suitable for all walking tots, just adapt your expectations to your child's skill level. It helps develop the large muscle groups in the legs, and hones their co-ordination skills. Tying it into the song helps them learn numbers, or reinforce numbers if your child already knows them. So simple!
Pipecleaner Threading
*This activity is for older toddlers who no longer put things in their mouths*
I set Eden up with a shaker from the kitchen (could also be a parmesan cheese shaker, or a colander, or a sieve), and some pipecleaners and a bag of hair beads (children of the 90's, remember these?). I didn't even need to direct her at all; she immediately began putting the pipecleaners into the holes in the shakers, arranging and rearranging them until she was satisfied. Then she threaded the beads onto the pipecleaners. Of course, this was the object all along, but I was thrilled that she had figured it out for herself.


I set Eden up with a shaker from the kitchen (could also be a parmesan cheese shaker, or a colander, or a sieve), and some pipecleaners and a bag of hair beads (children of the 90's, remember these?). I didn't even need to direct her at all; she immediately began putting the pipecleaners into the holes in the shakers, arranging and rearranging them until she was satisfied. Then she threaded the beads onto the pipecleaners. Of course, this was the object all along, but I was thrilled that she had figured it out for herself.


She asked me not to pack it away that night, because she wanted to play with it in the morning, and in the morning she went back to it, continued to thread the beads onto it, and declared that this was her 'pretty bird'. So I made a 'beak' with yellow paper, wings from extra pipecleaners and put some blutack on the back of the beak and on the back of some googly eyes. She stuck them onto the shaker to make a face, and taped the wings on. Voila! Her 'pretty bird' is finished and ready for play. I twined the tips of the pipecleaners together to stop beads from flying off as she slid it around the table.


This activity is an opportunity for your tot to use their creativity, imagination, and their emerging fine motor skills. I thought you could also make the pipecleaner-ed shaker into a girl: twist the ends of the pipecleaners over so the beads don't fall off, then bend the pipecleaners down for hair, add a face and there you have it! Make a few, and you've got some puppets who can interact (further stimulating your child's imagination).
This post has been linked to Monday Madness over at Art For Little Hands
Monday, October 17, 2011
PLAY TIME ~ OCT 17th - 23rd
This week, play with COLOURED RICE.
Coloured rice is so easy to make, click here for the recipe, or here for our experiments with it.
For a baby, you may make a feely bag or some shakers. For a toddler, you could set up a pouring station or a pretend stovetop (a nappy box with circles drawn on some paper and stuck to the top, makes a great stove) and let your child 'cook' with it.
Please post your game/activity in the comments section below this post so that we can inspire each other with our ideas! Have fun!
Alphabet Albums
How did it get to be October so quickly? I realised, to my dismay, that there are only two and a bit months left until Christmas, and I'm woefully behind on my Chrissy shopping.
I've been making up an alphabet album for Eden with photos of us, her toys and things that matter to her, and I've decided to make some for my friend's children (with photos of their families). Here's a few samples of some of our pages:


Alphabet albums are not just a good way of teaching your child the alphabet (which E. has known for a while), I'm going to be using it to teach her about the sounds that different letters make (phonetics) and how we can hear those sounds in words. She knows a few of them, but other letters are harder to teach. For example, she knows that 'A' is for 'Ava', but doesn't yet understand that 'A' can make a number of other sounds (think of words like 'astronaut', 'ask' or the sound 'a' makes in 'card'). Also, as she develops further in her understanding I can swap some of the pictures out and put some more difficult words in or put them into simple sentences. Plus, she can spot her own things in the pictures and the bright colours look attractive and will hopefully hold her interest.
Foam Fun

 You have to buy a pack of foam sheets (try saying that five times fast, foam sheets, foam sheets, foam sheets...). They're only 50 cents for a pack of 10 sheets (yup, I just double checked my receipt, 50 cents folks!), and they're such a versatile item to add to your craft box.
  I drew some basic shapes onto some sheets with a pencil, then cut them out - keeping the off-cuts too, as they tend to make the most interesting forms. I gave them to Eden with a shallow container of water and a sponge brush, and she brushed the foam shapes with water and stuck them to the window.
  The concept is for your child to create pictures on the windows, - which Eden did, but then she put the sponge brush away and started soaking the foam in the water. She told me she was washing them 'til they were nice and clean, then hanging them out to dry. She also used some squares as sponges, cleaning up the drops of water on the floor ("is messy, messy, messy. That's better, hooray!"). She's been at it for an hour and a bit now, with no signs of abating!
 I found this idea at Inspiration Surrounds, Creativity Abounds and will definitely use it again!
Saturday, October 15, 2011
Another Paint Chip Game!
I took eight of our spare paint chips which were the same size but different colours, and drew some basic pictures on them in pairs. I chose pictures that could lead to other activities, like singing or pretending games. We will be laying the paint chips out on the table, coloured side down, and playing the memory game as before. An alternative game is to shuffle the cards, offer them to your child coloured side down, and ask them to pick one. Sing a song that corresponds to the card. 

Our cards have pictures of:
- Rabbits: "Miss Bunny" or "Little Peter Rabbit"
- Ducks: "3 Little Ducks Went Out One Day" or "Ducks Like Rain"
- Frogs: "Mr Frog Went Out" or "Frogs Go 'La De Da De Da'"
- A Face: "Eyes and Ears and Mouth and Nose" or "If You're Happy and You Know It [touch your eyes/ears/mouth/nose]" - the latter adapted to include facial features
Another idea is to get your child to choose a two different cards, and you make up a (very) simple story about them. For example, your tot chooses a rabbit card and a frog card. You could say, "One day Mrs. Bunny wanted to make a cake, but she didn't have any flour left. So she took her basket and went for a walk to visit her friend, Mr. Ribbity, who lived nearby. Mr. Ribbity said, 'Of course you can borrow some flour, Mrs. Bunny!' Then Mrs. Bunny replied, "Thank you Mr. Ribbity! Would you like to come to my house and share some of the cake with me?" And so, the two friends shared a delicious cake for supper. The end."
I'm really looking forward to playing these games with Eden. I hope you (whoever you are) are finding these ideas helpful! Ciao for now! ~ L.
Muffin Tray Sorting

Paint Chip Memory Game

My hubby went to Bunnings and grabbed a stack of various paint chips, and the ones that he got duplicates of, I'm going to use as a memory game. Simply get two or three matching pairs of paint chips, turn them coloured side down, and get your toddler to turn them over two at a time. The aim is to find the matching pairs.

Peg Matching Game

 I'm a bit excited about this one! I made a wheel with some basic images on it, drew a few lines across it to portion off each image, stuck it to cardboard and cut it out. Then I got some wooden pegs, drew the same images onto little stickers and stuck (and sticky-taped) them to the pegs. I made the images very basic so that they would be easy to draw.
If you like this idea, you can download it from our Happy Little Munchkins Printables site, where there is also a version with the letters 'A, B, C, D' and the numbers '1, 2, 3, 4' on it.
Happy Matching!
Wednesday, October 12, 2011
Bubbles Challenge Part 2
I thought I'd tackle some bubble painting with Eden for this weeks Play Time Challenge, but unfortunately it did not go as well as planned. To do bubble painting, you need a container, powdered paint/s, detergent, straws and paper. You mix 1/4 cup of detergent in with some powdered paint to get the colour you want, then get your child to blow into the paint mix with a straw to form lots of little bubbles (which stay in the container and don't pop). You'll need to make the colour extremely bright in the mix because once the bubbles pop on the paper, they're much paler. Once the bubbles are overflowing the container, take your paper and carefully roll it around on top of the bubbles, but don't press down. The result should look like coloured bubbles have burst on your paper.
 I don't have any powdered paint, and I don't plan on getting any (pretty expensive stuff), so I used normal non-toxic poster paint. I poured a fair wallop of if in to make the colour vibrant but that meant that the detergent was too diluted and the bubbles didn't, well, bubble properly. They certainly didn't overflow the container. So I had to grab some much smaller bits of paper to dip into the containers instead. The whole thing was a bit of a debacle, but Eden didn't seem to notice. She was to preoccupied with blowing bubbles into the paint mix to notice that our activity wasn't going as planned. Suits me! Will definitely try this again and adjust the detergent to paint ratio and see how we go.
A note: if you're going to try this, maybe get your toddler to practice blowing through the straw first, the last thing you want is for them to accidently inhale the paint mix. They could blow bubbles into a cup of water, blow pom poms or cotton wool balls around, blow on your face, etc.
What Do Pom Poms and Ice Cubes Have In Common?
Answer: Ice cube trays of course! 
I can practically see eyebrows being raised as I write this, but it's true. One of the best activities I do with Eden is to set her up with some empty ice cube trays, a bag of pom poms and a pair of mini tongs. She sits happily and transfers the pom poms from one tray to the other with the tongs (great for fine motor skill development), or sorts them into the trays by colour or size, or decides that the pom poms are my lunch and that Mummy needs to be a good girl and eat all of it, thank-you-very-much.

Actually, pom poms are a great item to add to your little box-of-tricks, they could be rabbit tails for puppets, decorations for party hats or clown hats (dress ups!), your littlie could try blowing the pom poms from one point to another with a straw, you could put a whole bunch of them in a bag of netting as a tactile bag for babies, or you could put some in a small plastic bottle for babies to play with - it's very visually stimulating for them. Be careful around babies though, brightly coloured and small pom poms may look like fun to chew on...and I'm pretty sure they're not. Keep away from the bubbas unless they're in a sealed bottle or bag.
From Threadings to Mobile

This is what we ended up making with Eden’s threading: a mobile. I got a plastic hanger and tied the threadings to it, then I got Eden to wrap masking tape around the knots to secure them. Voila! So easy to do. At the moment this is hanging in her bedroom on her cupboard door, but I’m hoping to do a few more of them with her and extend the mobile a bit more, to hang above Ava’s change table.
Recipe - Coloured Rice

- A bag of cheap white rice (can be found at Reject Shop or Sam's Warehouse)
- Food dye in various colours
- Water
- Medium sized ziplock bags
- Waxed paper
- Put 1 tsp of water into a bag and add food colouring directly into the water, 4-5 drops is about right.
- Pour half a cup of rice into the bag, seal, and squish the rice around until all coated in the food dye.
- I flattened the rice out, still in the sealed bag, and let it absorb the colouring for about 15 minutes.
- Break up the rice whilst still in the bag (it will have hardened a bit).
- Empty the bag out onto waxed paper, and spread the rice out to allow it ti dry fully.
- You're done! It's play time!
Coloured Rice


For a different experience, I set it up again this afternoon with bits from her tea set and some of her play pots, pans and utensils. She had a ball serving rice tea and pouring it from the teapot into the cups (see below).


.
At nearly six months old, Ava is obviously to young to play with rice in the same way as Eden, so I put some rice into a medium sized ziplock bag and put a few little objects in it (see photo below) and sealed the bag up with masking tape. She mushes it around with her hands (and her feet) to find the objects hidden by the rice. It's actually a very tactile activity for her, even though she's feeling the objects through the plastic, but obviously requires supervision, just in case the bag breaks.


Other coloured rice activities which I intend to try include:
- Pouring some into plastic bottles to form shakers.
- Pouring some into a cardboard cylinder and sealing up the ends, getting your tot to decorate the cylinder with stickers or oil-based crayons to make some more shakers!
- Drawing a basic picture (or a letter/number) onto stiff cardboard with a thick marker, covering the picture with PVC and letting your littlie sprinkle rice over it. Leave to set for a few minutes, then shake off the excess.
- Using the rice to make some beanbags (ok, ricebags) from felt. You'd obviously have to do the sewing yourself, but your toddler could 'paint' a picture on the bags with fabric paint, or they could superglue sequins or lace onto it.
I'm sure there are heaps of other ideas out there, feel free to post ideas you have in the comments section! ~ L.
This post has been linked to Baby Play Friday at Sense of Wonder.
This post has been linked to Baby Play Friday at Sense of Wonder.
Colour Theme Day!
I’m excited to announce the date for our first Colour Theme Day!
Please join us on Tuesday, October 25th at Lysterfield Lake Park in Narre Warren North at 10:00am for a GREEN DAY!
Come dressed in green with your green-dressed kids. Bring green food and green drinks. We’ll have a reading or two from some ‘Green’ books, and a lot of fun!
Anyone is welcome, BYO everything. Meet at the picnic area near the ‘Beach’ carpark – when you enter Lysterfield’s grounds, turn left into the parking area then drive straight down, down, down, until you get to the ‘Beach’ carpark.
Please let me know if you’re coming, (because if it’s just me, then I’ll stay home and have another ‘green day’). Tell your friends about it, and then bring them!
Bubbles Challenge
Ava loved this! I found it difficult to think of a bubbles activity as per this week's Play Time Challenge.

Subscribe to:
Posts (Atom)